Write Screen Sharing Application for Your Own WebSite

Do you want to write multi-user screen sharing application for your own website?

Note: This tutorial uses WebRTC for multi-user screen sharing.

First step, download all codes from this directory: github/Chrome-Extensions/desktopCapture

Second step, modify manifest.json file line 17, and replace with either localhost or your real domain name:

{
    "content_scripts": [ {
       "js": [ "content-script.js" ],
       "all_frames": true,
       "run_at": "document_end",
       "matches": ["https://your-domain.com/*"]
    }]
}

Fourth step, either max a zip and deploy new chrome extension to Google App Store, or install directly using "chrome://extensions" page.


Fifth step, download ONE_to_MANY screen sharing demo from this page: RTCMultiConnection/demos/Screen-Sharing.html


Sixth step, modify a few lines in the above demo:

Search for these two lines:

<script src="/dist/RTCMultiConnection.min.js"></script>
<script src="/socket.io/socket.io.js"></script>

Replace above two lines with:

<script src="https://rtcmulticonnection.herokuapp.com//dist/RTCMultiConnection.min.js"></script>
<script src="https://rtcmulticonnection.herokuapp.com//socket.io/socket.io.js"></script>

Now search for this line:

connection.socketURL = '/';

Replace above line with:

connection.socketURL = 'https://rtcmulticonnection.herokuapp.com:443/';

Now you are done.

Seventh and the last step, upload above HTML file on any HTTPs domain.

You can try on LocalHost as well.

Non-LocalHost domains requires HTTPs.

You can upload to Google Drive, DropBox or any free hosting website that supports HTTPs e.g. appspot.com.


How to test screen sharing?

First person shares his screen and about 10 people can join/see/view his screen.

You can open unlimited parallel rooms.

Maximum number of people who can view single screen is 14. We do not support more than 14 viewers/receivers.

There is a separate demo that allows us share screen over more than 14 users: https://rtcmulticonnection.herokuapp.com/demos/Scalable-Screen-Broadcast.html

RecordRTC and Upload to PHP Server

This tutorial explains how to record videos and microphones using RecordRTC; and upload recorded data to your PHP server.

First step, write a simple RecordRTC video recording application.

Hope you didn't miss this youtube tutorial: https://www.youtube.com/watch?v=YrLzTgdJ-Kg

Here is a LIVE jsFiddle demo: https://jsfiddle.net/e32jwtn5/

Source codes for the demo:

<!DOCTYPE html>
<html>
    <head>
        <script src="https://cdn.WebRTC-Experiment.com/RecordRTC.js"></script>
    </head>

    <body>
        <video id="your-video-id" controls="" autoplay=""></video>

        <script type="text/javascript">
            // capture camera and/or microphone
            navigator.mediaDevices.getUserMedia({ video: true, audio: true }).then(function(camera) {

                // preview camera during recording
                document.getElementById('your-video-id').muted = true;
                document.getElementById('your-video-id').srcObject = camera;

                // recording configuration/hints/parameters
                var recordingHints = {
                    type: 'video'
                };

                // initiating the recorder
                var recorder = RecordRTC(camera, recordingHints);

                // starting recording here
                recorder.startRecording();

                // auto stop recording after 5 seconds
                var milliSeconds = 5 * 1000;
                setTimeout(function() {

                    // stop recording
                    recorder.stopRecording(function() {
                        
                        // get recorded blob
                        var blob = recorder.getBlob();

                        // open recorded blob in a new window
                        window.open( URL.createObjectURL(blob) );

                        // release camera
                        document.getElementById('your-video-id').srcObject = null;
                        camera.getTracks().forEach(function(track) {
                            track.stop();
                        });

                        // you can preview recorded data on this page as well
                        document.getElementById('your-video-id').src = URL.createObjectURL(blob);

                    });

                }, milliSeconds);
            });
        </script>
    </body>
</html>

Second step, write a PHP file. Lets name it "save.php".

<?php
// upload directory
$filePath = 'uploads/' . $_POST['video-filename'];

// path to ~/tmp directory
$tempName = $_FILES['video-blob']['tmp_name'];

// move file from ~/tmp to "uploads" directory
if (!move_uploaded_file($tempName, $filePath)) {
    // failure report
    echo 'Problem saving file: '.$tempName;
    die();
}

// success report
echo 'success';
?>

Third & last step, upload recorded blob to PHP.

var formData = new FormData();

// recorded data
formData.append('video-blob', recordedBlob);

// file name
formData.append('video-filename', recordedBlob.name);

// upload using jQuery
$.ajax({
    url: 'save.php', // your server URL
    data: formData,
    cache: false,
    contentType: false,
    processData: false,
    type: 'POST',
    success: function(response) {
        if (response === 'success') {
            alert('successfully uploaded recorded blob');
        } else {
            alert(response);
        }
    }
});

Here is a complete demo, uploading to PHP using jQuery:


<!DOCTYPE html>
<html>
    <head>
        <script src="https://cdn.WebRTC-Experiment.com/RecordRTC.js"></script>
        <script src="https://code.jquery.com/jquery-3.2.1.min.js"></script>
        <style>
            video {
              max-width: 100%;
              border: 5px solid yellow;
              border-radius: 9px;
            }
            body {
              background: black;
            }
            h1 {
              color: yellow;
            }
        </style>
    </head>

    <body>
        <h1 id="header">RecordRTC Upload to PHP</h1>
        <video id="your-video-id" controls="" autoplay=""></video>

        <script type="text/javascript">
            // capture camera and/or microphone
            navigator.mediaDevices.getUserMedia({ video: true, audio: true }).then(function(camera) {

                // preview camera during recording
                document.getElementById('your-video-id').muted = true;
                document.getElementById('your-video-id').srcObject = camera;

                // recording configuration/hints/parameters
                var recordingHints = {
                    type: 'video'
                };

                // initiating the recorder
                var recorder = RecordRTC(camera, recordingHints);

                // starting recording here
                recorder.startRecording();

                // auto stop recording after 5 seconds
                var milliSeconds = 5 * 1000;
                setTimeout(function() {

                    // stop recording
                    recorder.stopRecording(function() {
                        
                        // get recorded blob
                        var blob = recorder.getBlob();

                        // generating a random file name
                        var fileName = getFileName('webm');

                        // we need to upload "File" --- not "Blob"
                        var fileObject = new File([blob], fileName, {
                            type: 'video/webm'
                        });

                        var formData = new FormData();

                        // recorded data
                        formData.append('video-blob', fileObject);

                        // file name
                        formData.append('video-filename', fileObject.name);

                        document.getElementById('header').innerHTML = 'Uploading to PHP using jQuery.... file size: (' +  bytesToSize(fileObject.size) + ')';

                        // upload using jQuery
                        $.ajax({
                            url: 'https://webrtcweb.com/RecordRTC/', // replace with your own server URL
                            data: formData,
                            cache: false,
                            contentType: false,
                            processData: false,
                            type: 'POST',
                            success: function(response) {
                                if (response === 'success') {
                                    alert('successfully uploaded recorded blob');

                                    // file path on server
                                    var fileDownloadURL = 'https://webrtcweb.com/RecordRTC/uploads/' + fileObject.name;

                                    // preview the uploaded file URL
                                    document.getElementById('header').innerHTML = '<a href="' + fileDownloadURL + '" target="_blank">' + fileDownloadURL + '</a>';

                                    // preview uploaded file in a VIDEO element
                                    document.getElementById('your-video-id').src = fileDownloadURL;

                                    // open uploaded file in a new tab
                                    window.open(fileDownloadURL);
                                } else {
                                    alert(response); // error/failure
                                }
                            }
                        });

                        // release camera
                        document.getElementById('your-video-id').srcObject = null;
                        camera.getTracks().forEach(function(track) {
                            track.stop();
                        });

                    });

                }, milliSeconds);
            });

            // this function is used to generate random file name
            function getFileName(fileExtension) {
                var d = new Date();
                var year = d.getUTCFullYear();
                var month = d.getUTCMonth();
                var date = d.getUTCDate();
                return 'RecordRTC-' + year + month + date + '-' + getRandomString() + '.' + fileExtension;
            }

            function getRandomString() {
                if (window.crypto && window.crypto.getRandomValues && navigator.userAgent.indexOf('Safari') === -1) {
                    var a = window.crypto.getRandomValues(new Uint32Array(3)),
                        token = '';
                    for (var i = 0, l = a.length; i < l; i++) {
                        token += a[i].toString(36);
                    }
                    return token;
                } else {
                    return (Math.random() * new Date().getTime()).toString(36).replace(/\./g, '');
                }
            }
        </script>
    </body>
</html>

Here is a demo uploading to PHP using simple JavaScript (no-jQurery):


<!DOCTYPE html>
<html>
    <head>
        <script src="https://cdn.WebRTC-Experiment.com/RecordRTC.js"></script>
        <style>
            video {
              max-width: 100%;
              border: 5px solid yellow;
              border-radius: 9px;
            }
            body {
              background: black;
            }
            h1 {
              color: yellow;
            }
        </style>
    </head>

    <body>
        <h1 id="header">RecordRTC Upload to PHP</h1>
        <video id="your-video-id" controls="" autoplay=""></video>

        <script type="text/javascript">
            // capture camera and/or microphone
            navigator.mediaDevices.getUserMedia({ video: true, audio: true }).then(function(camera) {

                // preview camera during recording
                document.getElementById('your-video-id').muted = true;
                document.getElementById('your-video-id').srcObject = camera;

                // recording configuration/hints/parameters
                var recordingHints = {
                    type: 'video'
                };

                // initiating the recorder
                var recorder = RecordRTC(camera, recordingHints);

                // starting recording here
                recorder.startRecording();

                // auto stop recording after 5 seconds
                var milliSeconds = 5 * 1000;
                setTimeout(function() {

                    // stop recording
                    recorder.stopRecording(function() {
                        
                        // get recorded blob
                        var blob = recorder.getBlob();

                        // generating a random file name
                        var fileName = getFileName('webm');

                        // we need to upload "File" --- not "Blob"
                        var fileObject = new File([blob], fileName, {
                            type: 'video/webm'
                        });

                        uploadToPHPServer(fileObject, function(response, fileDownloadURL) {
                            if(response !== 'ended') {
                                document.getElementById('header').innerHTML = response; // upload progress
                                return;
                            }

                            document.getElementById('header').innerHTML = '<a href="' + fileDownloadURL + '" target="_blank">' + fileDownloadURL + '</a>';

                            alert('Successfully uploaded recorded blob.');

                            // preview uploaded file
                            document.getElementById('your-video-id').src = fileDownloadURL;

                            // open uploaded file in a new tab
                            window.open(fileDownloadURL);
                        });

                        // release camera
                        document.getElementById('your-video-id').srcObject = null;
                        camera.getTracks().forEach(function(track) {
                            track.stop();
                        });

                    });

                }, milliSeconds);
            });

            function uploadToPHPServer(blob, callback) {
                // create FormData
                var formData = new FormData();
                formData.append('video-filename', blob.name);
                formData.append('video-blob', blob);
                callback('Uploading recorded-file to server.');
                makeXMLHttpRequest('https://webrtcweb.com/RecordRTC/', formData, function(progress) {
                    if (progress !== 'upload-ended') {
                        callback(progress);
                        return;
                    }
                    var initialURL = 'https://webrtcweb.com/RecordRTC/uploads/' + blob.name;
                    callback('ended', initialURL);
                });
            }

            function makeXMLHttpRequest(url, data, callback) {
                var request = new XMLHttpRequest();
                request.onreadystatechange = function() {
                    if (request.readyState == 4 && request.status == 200) {
                        if (request.responseText === 'success') {
                            callback('upload-ended');
                            return;
                        }
                        alert(request.responseText);
                        return;
                    }
                };
                request.upload.onloadstart = function() {
                    callback('PHP upload started...');
                };
                request.upload.onprogress = function(event) {
                    callback('PHP upload Progress ' + Math.round(event.loaded / event.total * 100) + "%");
                };
                request.upload.onload = function() {
                    callback('progress-about-to-end');
                };
                request.upload.onload = function() {
                    callback('PHP upload ended. Getting file URL.');
                };
                request.upload.onerror = function(error) {
                    callback('PHP upload failed.');
                };
                request.upload.onabort = function(error) {
                    callback('PHP upload aborted.');
                };
                request.open('POST', url);
                request.send(data);
            }

            // this function is used to generate random file name
            function getFileName(fileExtension) {
                var d = new Date();
                var year = d.getUTCFullYear();
                var month = d.getUTCMonth();
                var date = d.getUTCDate();
                return 'RecordRTC-' + year + month + date + '-' + getRandomString() + '.' + fileExtension;
            }

            function getRandomString() {
                if (window.crypto && window.crypto.getRandomValues && navigator.userAgent.indexOf('Safari') === -1) {
                    var a = window.crypto.getRandomValues(new Uint32Array(3)),
                        token = '';
                    for (var i = 0, l = a.length; i < l; i++) {
                        token += a[i].toString(36);
                    }
                    return token;
                } else {
                    return (Math.random() * new Date().getTime()).toString(36).replace(/\./g, '');
                }
            }
        </script>
    </body>
</html>

Want to use up-to-dated PHP file uploading code? Download this file:

https://github.com/muaz-khan/RecordRTC/blob/master/RecordRTC-to-PHP/save.php

Having PHP upload issues on your own server? Please check this wiki:

https://github.com/muaz-khan/RecordRTC/wiki/PHP-Upload-Issues

Hints for PHP upload issues:
  • You need to enable read-write access for "uploads" directory
  • You need to allow "save.php" file to move uploaded files from ~/tmp directory to your "./uploads" directory.
  • You need to set "post_max_size" to at least 100 MB
  • You need to set "upload_max_filesize" to at least 100 MB
  • You need to set "max_input_time" to at least 10800 (or at least 2-3 minutes)
  • For detailed information, please check the wiki page

How PHP saves the recorded blob?


First step, PHP reads "video-filename" HTTP_POST parameter. This parameter helps us set uploaded file name.

Second step, PHP checks for "video-blob" HTTP_POST (i.e. $_FILES) parameter. This parameter allows us get uploaded file data.

Third step, "video-blob" parameter has a nested "tmp_name" paremter i.e.

$tmp_name = $_FILES['video-blob']['tmp_name'];

"tmp_name" parameter helps us locate the uploaded file on ~/tmp directory.

Which means that file is already uploaded to ~/tmp directory. We simply need to move file from ~/tmp to our custom location.

That's why we use "move_upload_file" method.

Fourth and last step, use "move_upload_file" method to move uploaded file from ~/tmp to "./uploads" directory.

"move_upload_file" takes two parameters. First parameter is ~/tmp/fileName.webm and second parameter is "./uploads/fileName.webm".

This method fails in following cases:

  • File was not uploaded to ~/tmp directory; reason: max_upload_filesize or upload_timeout issues.
  • "./uploads" directory doesn't allows "save.php" file to move file. i.e. you did not set read-write privileges for "./uploads" directory.

Here is how to set read-write privileges for "./uploads" directory (using PHP):

<?php
// Read and write for owner, nothing for everybody else
chmod("./uploads", 0600);

// Read and write for owner, read for everybody else
chmod("./uploads", 0644);

// Everything for owner, read and execute for others
chmod("./uploads", 0755);

// Everything for owner, read and execute for owner's group
chmod("./uploads", 0750);
?>

However BASH based privileges are preferred/recommended:

[sudo] chmod 755 ./uploads
[sudo] chown -R www-data:www-data ./uploads

You can use "apache:apache" if "www-data:www-data" doesn't works above.

Searching for RecordRTC simple demos? Please check this directory:

https://github.com/muaz-khan/RecordRTC/tree/master/simple-demos

Have issues/bugs/questions, please report here: https://github.com/muaz-khan/RecordRTC/issues/new

Take photo from a webcam using JavaScript

Do you want to capture photos from your web-camera and generate images in any supported format e.g. PNG, JPEG, GIF, WebP etc.?

First method, capture photo using Canvas2D API:

Live demo: https://www.webrtc-experiment.com/takePhoto/

Below example captures photo from an HTML5 Video element:

var yourVideoElement = document.querySelector('video');

// pass your HTML5 Video Element
var photo = takePhoto(yourVideoElement);
window.open(photo);

function takePhoto(video) {
    var canvas = document.createElement('canvas');
    canvas.width = video.videoWidth || video.clientWidth;
    canvas.height = video.videoHeight || video.clientHeight;

    var context = canvas.getContext('2d');
    context.drawImage(video, 0, 0, canvas.width, canvas.height);

    return canvas.toDataURL('image/png');
}

Above code returns PNG. Here is how to get different formats:

var PNG = canvas.toDataURL('image/png');
var JPEG = canvas.toDataURL('image/jpeg');
var GIF = canvas.toDataURL('image/gif');
var WebP = canvas.toDataURL('image/webp', 1);


Second method, capture photo using "ImageCapture" API:

Live Demo: https://www.webrtc-experiment.com/ImageCapture/

You need to pass MediaStreamTrack (aka Video-Track) object:

if (typeof ImageCapture === 'function') {
    var firstVideoTrack = yourCameraStream.getVideoTracks()[0];
    var imageCapture = new ImageCapture(firstVideoTrack);
    imageCapture.takePhoto().then(function(blob) {
        var photo = URL.createObjectURL(blob);
        window.open(photo);
    });
}

Note: ImageCapture API requires Chrome version >= 60.

WebRTC captureStream API

You can use "captureStream" method to generate a realtime media stream from any HTML5 video or canvas-2d element.
var realtimeStream = canvasElement.captureStream(15);

Using captureStream API:

  • You can record WebGL based 3D games; you can also share in realtime with many users using RTCPeerConnection API
  • You can record canvas-2D animation or drawings; you can share in realtime as well using same RTCPeerConnection API
  • You can share your local video files e.g. WebM, Mp4, FLV, TS-M3U8 (hls-live-streaming) or audio files e.g. Wav, Ogg, Mp3 etc. You can record specific portions of these files as well.

How to record WebGL or Canvas2D animations?

You can use RecordRTC to record canvas-2D or 3D animations. You can try a few demos here:
First step, generate a realtime stream from HTML5 canvas element:
var realtimeStream = canvasElement.captureStream(15);
The parameter "15" is named as "frame-rates". We requested 15 fps stream.

Second step, record the resulting stream using RecordRTC or MediaStreamRecorder API:
var realtimeStream = canvasElement.captureStream();

var parameters = {
    mimeType: 'video/webm'
};

var recorder = RecordRTC(realtimeStream, parameters);

recorder.setRecordingDuration(5 * 1000).onRecordingStopped(function() {
    var recordedVideo = recorder.getBlob();
    var file = new File([recordedVideo], 'filename.webm', {
        type: 'video/webm'
    });
    var fileURL = URL.createObjectURL(file);
    window.open(fileURL);
});

recorder.startRecording();
Third and last step, repeatedly draw shapes or animations on canvas 2d surface:
var context = canvasElement.getContext('2d');

(function looper() {
    context.clearRect(0, 0, canvasElement.width, canvasElement.height);
    context.drawImage(video, 0, 0, canvasElement.width, canvasElement.height);

    // draw shapes every 10 milliseconds
    setTimeout(looper, 10);
})();

How to broadcast/share WebGL or Canvas2D animations with other users?

You can "[RTCPeerConnection] addStream" method to share (broadcast) canvas-2D or 3D animations with remote users. You can try this demo:
First step, generate a realtime stream from HTML5 canvas element:
var realtimeStream = canvasElement.captureStream(15);
Second and last step, share with remote users using RTCPeerConnection API:
var peer = new webkitRTCPeerConnection(parameters);

// check this line
peer.addStream(canvasStream);

// now either create offer or answer descriptions
peer.createOffer(successCallback, failureCallback, parameters);

How to share or record microphone audio along with Canvas2D animations?

It is simple: use "addTrack" method to merge tracks.
var microphoneStream = captureUsingNavigatorDotGetUserMediaAPI({
    audio: true
});

// merge audio tracks into canvas stream
microphoneStream.getAudioTracks().forEach(function(track) {
    // check this line
    canvasStream.addTrack(track);
});

// now either record "canvasStream" or share using RTCPeerConnection API
peer.addStream(canvasStream); // microphone+canvas2D

Can I capture stream from an <audio> element?

Simply yes. You can capture audio either from <audio> tag or otherwise <video> element.

Remember: <video> tag also accepts audio-only stream. Your stream do NOT need to have video tracks. Here is how to capture audio stream from a <video> element:
videoElement.src = URL.createObjectURL(microphoneStream);

// capture from <video> tag
var capturedStream = videoElement.captureStream();

// initiate a standalone instance
var audioOnlyStream = new webkitMediaStream();

// merge only audio tracks
capturedStream.getAudioTracks().forEach(function(track) {
    audioOnlyStream.addTrack(track);
});

// either record "audioOnlyStream" or share using RTCPeerConnection API
peer.addStream(audioOnlyStream);

Unable to use "captureStream" API?

You may need to enable following chrome-flag; then relaunch the chrome browser:
chrome://flags/#enable-experimental-web-platform-features

References:

Disable ICE Trickling

ICE trickling is a process where candidate-pairs are shared as soon as gathered by the ICEAgent.

Its true that, there is NO JavaScript API "currently" available in RTCWeb drafts to disable ICE-trickling process however, there is a trick that can be used to merge all candidate pairs in the session-description, and then you merely need to share that "single" SDP only.

The trick is simple: Wait until "end-of-candidate" signal is fired.

Usually "onicecandidate" event returns "NULL" entry for "event.candidate" object.

In "old-good" days, we were watching for "oniceconnectionstatechange" event, and checking for "peer.iceGatheringState === 'complete'" to return the SDP.

BTW, you can still listen for both "end-of-candidate" NULL value, as well as "peer.iceGatheringState === 'complete'".

peer.oniceconnectionstatechange = function(event) {
    if (peer.iceGatheringState === 'complete') {
        send_sdp_to_remote_peer();
    }
};

peer.onicecandidate = function(event) {
    if (event.candidate === null) {
        return send_sdp_to_remote_peer();
    }
};

var isSdpSent = false;

function send_sdp_to_remote_peer() {
    if (isSdpSent) return;
    isSdpSent = true;
  
    var sdp = peer.localDescription;
    socket.emit('remote-sdp', sdp);
}


WebRTC for ASP.NET developers

This post links some demos and tutorials for ASP.NET webforms and ASP.NET MVC developers to quick start and implement WebRTC in their applications.

First of all, please don't forget to check this post: I want to learn WebRTC!

Here is a simple one-to-one ASP.NET MVC based demo & source code:
Here is ASP.NET webforms based demo:

This demo uses MS-SQL to store SDP and ICE messages and to sync the data among room participants. This demo is having following functionalities:
  1. Private/Public rooms creations
  2. Password protected rooms
  3. MS-SQL for signaling and presence detection
  4. One-to-One connections
  5. List of a public rooms, stats of each room, number of users in each room etc.

There is another XHR-based signaling demo and source code that can fit in any WebRTC application and demo:

This demo is having following features:
  1. It can be used in any WebRTC Experiment
  2. It uses MS-SQL for signaling
  3. It supports re-usability of the code
  4. It can be used with RTCMultiConnection.js and DataChannel.js
Here is how it can be used in RTCMultiConnection demos:
There is another implementation and source code that uses WebSync:
WebSync is an implementation of the Bayeux specification, commonly known as "comet", for the .NET framework and IIS. Ref
Try WebSync demos in action:
For those who wanna use SignalR instead:
P.S. This post will be updated for future ASP.NET based WebRTC demos e.g. SignalR demos.

WebRTC Tips & Tricks

This blog post is added for WebRTC newbies and beginners who wanna learn key-ideas; get code snippets and enjoy WebRTC life!

1. How to mute/unmute media streams?

Remember, mute/unmute isn't implemented as a default/native features in either media capturing draft i.e. getUserMedia API also in WebRTC draft i.e. RTCPeerConnection API.

Also, there is no "onmuted" and "onunmuted" event defined or fired in the WebRTC native implementations.

Usually, as per chromium team's suggestions, media-tracks are enabled/disabled to mute/unmute the streams.

Remember, "MediaStreamTrack.enabled=false" NEVER sends silence audio or blank/black video; it doesn't stop packet transmission. Although when you set "MediaStreamTracks.enabled=false", packets are devoid of meaningful data. A solution for this approach is to hold/unhold tracks from SDP and renegotiate the connections. See next section for more information.

MediaStream object is just a synchronous container. You shouldn't consider it an object interacting with the media source (audio/video input/output devices). That's why it was suggested to move "stop" method from "MediaStream" level to "MediaStreamTracks" level.

MediaStreamTracks are written to define input/output devices' kind. A single MediaStreamTrack object can contain multiple media devices.

MediaStreamTracks has "enabled" property as well as "stop" method. You can use "stop" method to leave relevant media sources — whether it is audio source or video one.

Mute/UnMute is usually happened by setting Boolean values for the "enabled" property per each MediaStreamTrack.

When a MediaStreamTrack is "enabled=true" it is unmuted; when a MediaStreamTrack is "enabled=false" it is muted.

var audioTracks = localMediaStream.getAudioTracks();
var videoTracks = localMediaStream.getVideoTracks();

// if MediaStream has reference to microphone
if (audioTracks[0]) {
    audioTracks[0].enabled = false;
}

// if MediaStream has reference to webcam
if (videoTracks[0]) {
    videoTracks[0].enabled = false;
}

Keep in mind that you're disabling a media track locally; it will not fire any event on target users side. If you disabled video track; then it will cause "blank-video" on target-users side.

You can manually fire events like "onmuted" or "onmediatrackdisabled" by using socket that was used for signaling. You can send/emit messages like:

yourSignalingSocket.send({
    isMediaStreamTrackDisabled: true,
    mediaStreamLabel: stream.label
});

Target users' "onmessage" handler can watch for "isMediaStreamTrackDisabled" Boolean and fire "onmediatrackdisabled" accordingly:

yourSignalingSocket.onmessage = function (event) {
    var data = event.data;

    if (data.isMediaStreamTrackDisabled == true) {
        emitEvent('mediatrackdisabled', true);
    } else emitEvent('mediatrackdisabled', false);
};

Last point; disabling "remote" media stream tracks are useless unless remote user disables his "local" media stream tracks. So, use signaling-socket, exchange messages between users to inform them enable/disable media tracks and fire relevant events that can be used to display video-posters or overlappers!

People usually asks about "video.pause()" and "video.muted=true". Remember, you're simply setting playback status of the local video element; it will NEVER synchronize changes to other peers until you listen for "video.onplay" and "video.onpause" handlers.

You can also listen for "video.onvolumechange" to synchronize volume among all users.

Remember, you can use WebRTC data channels or websocket or any other signaling mean to synchronize such statuses.

2. How to hold/unhold media calls?

Currently, WebRTC signaling mechanism is based on offer/answer model which in turns uses session-description protocol (SDP) to exchange metadata and key-session-requirements among peers.

SDP is formatted in a way that MediaStreamTracks are given unique media-line; and each media line can contain references to multiple similar media tracks.

Each media-line has "a=sendrecv" attribute; which is used to exchange incoming/outgoing media directions. You can easily replace "sendrecv" with "inactive" to make that media track on hold.

Don't forget that a single media-line can contain multiple media stream tracks; so if you're planning to hold all audio tracks; then search for audio media-line in the SDP; and replace "a=sendrecv" with "a=inactive".

Also, please keep in mind that "sendrecv" isn't the only value given to "a=" attribute. Possible values are:
  1. sendrecv ——— two-way media flow
  2. sendonly ——— one-way outgoing media flow
  3. recvonly ——— one-way incoming media flow
  4. inactive  ——— call on hold; i.e. no media flow

So, you need to replace first three values with "inactive" to make list of identical media tracks on hold; then you can replace "inactive" with previous value to leave the "hold" status.

After altering local-session-descriptions (peer.localDescription); you MUST renegotiate peer connections to make sure new changes are applied on both peers side.

Renegotiation is a process to recreate offer/answer descriptions and set remote descriptions again.

Remember, you're not creating new peer connections; you're using existing peer objects and invoking createOffer/createAnswer as well as setRemoteDescription again.

Renegotiation works only on chromium based browsers in the moment; so hold/unhold feature will work only on chrome/opera.

You can learn more about renegotiation here: https://www.webrtc-experiment.com/docs/how-to-switch-streams.html

3. How to check if a peer connection is established?

Simply set an event listener for "oniceconnectionstatechange" and check for "peer.iceConnectionState=='completed'".

ICE connection state flows like this:

(success) new => checking => connected => completed
(failure) new => checking => connected => disconnected => new => closed
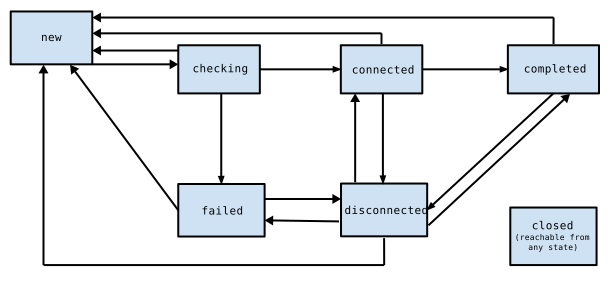


Sometimes ICE connection gets dropped out of network loss or unexpected situations. In such cases, "ice-connection-state" is always changed to "disconnected".

There is another dangerous point is that if you're renegotiating peers; then ice-connection-state is always changed to "disconnected" then it restarts: "new => checking => connected => completed => disconnected => new => checking => connected => completed"..

var peer = new RTCPeerConnection(iceSerersArray, optionalArgsArray);
peer.oniceconnectionstatechange = function() {
   if(peer.iceConnectionState == 'completed') {
      var message = 'WebRTC RTP ports are connected to UDP. ';
      message += 'Wait a few seconds for remote stream to be started flowing.';
      alert(message);
   }
};

4. How to check if a peer connection is closed or dropped?

Again, watch for "oniceconnectionstatechange" event handler and check for "peer.iceConnectionState=='disconnected'".

ICE Agent changes relevant candidates' state to "disconnected" in following cases:
  1. If peer connection is closed.
  2. If you're renegotiating media.....in this case, previous peer connection is closed and re-established again.

var peer = new RTCPeerConnection(iceSerersArray, optionalArgsArray);
peer.oniceconnectionstatechange = function() {
   if(peer.iceConnectionState == 'disconnected') {
      var message = 'WebRTC RTP ports are closed. ';
      message += 'UDP connection is dropped.';
      alert(message);
   }
};

5. How to check if browser has microphone or webcam?

There is a JavaScript library named as "DetectRTC.js"; which uses "getSources/getMediaDevices" API to fetch list of all audio/video input devices.

If there is no audio input device; then it says that:

Your browser has NO microphone attached or you clicked deny button sometime and browser is still denying the webpage to access relevant media.

CheckDeviceSupport(function (chrome) {
    if (chrome.hasMicrophone) {}

    if (chrome.hasWebcam) {}
});

// above function is defined here
function CheckDeviceSupport(callback) {
    var Chrome = {};

    // This method is useful only for Chrome!

    // "navigator.getMediaDevices" will be next!
    // "MediaStreamTrack.getSources" will be removed.

    // 1st step: verify "MediaStreamTrack" support.
    if (!window.MediaStreamTrack) return;

    // 2nd step: verify "getSources" support which is planned to be removed soon!
    // "getSources" will be replaced with "getMediaDevices"
    if (!MediaStreamTrack.getSources) {
        MediaStreamTrack.getSources = MediaStreamTrack.getMediaDevices;
    }

    // if still no "getSources"; it MUST be firefox!
    if (!MediaStreamTrack.getSources) {
        // assuming that it is older chrome or chromium implementation
        if (!!navigator.webkitGetUserMedia) {
            Chrome.hasMicrophone = true;
            Chrome.hasWebcam = true;
        }

        return;
    }

    // loop over all audio/video input/output devices
    MediaStreamTrack.getSources(function (sources) {
        var result = {};

        for (var i = 0; i &lt; sources.length; i++) {
            result[sources[i].kind] = true;
        }

        Chrome.hasMicrophone = result.audio;
        Chrome.hasWebcam = result.video;
        
        callback(Chrome);
    });
}


6. How to fix echo/noise issues?

According to this page:
Echo is a distortion of voice that occurs either when you place input/output audio devices closed together; or audio output level is too high or CPU usage exceeded by other applications or by the same application.

Firefox 29 and upper builds has a nice echo cancellation. Echo is also improved in chrome 34 and upper builds.

Make sure that your speaker's kHz values matches with your application's kHz values. Mismatch will lead to echo.

If you're using Mac OSX; then you can easily recover echo issues by enabling "ambient noise reduction". You can search the Google engine for how to enable for build-in audio devices on Mac.

It is possible to watch audio RTP-packets' audio level using getStats API; however there is no API other than Media Processing API that allows setting volume from JavaScript applications. Media Processing draft isn't standardized yet and AFAIK, none of the browser vendors implemented volume-specific API. Though, Gecko team implemented captureStreamUntilEnded API in their Firefox product from the same draft.

Make sure that you're not using WebAudio API along with getUserMedia or RTCPeerConnection API; because sometimes you accidentally or intentionally connect input node with output node which obviously causes huge echo.

Developers were suggesting headphones/microphones to overcome echo issues however it is appeared that such solutions doesn't matters. One must check all relevant conditions to make sure there is nothing causing noise.

7. How to check estimated bandwidth?

Sometimes it is known as "available bandwidth" or "bandwidth consumed". You can setup a listener over getStats API to check bytesSent per second. Then you can easily find-out bandwidth that your application is currently consuming.

Remember, you're checking bandwidth in one-to-one scenario; you need to follow some deeper-level tricks to find estimated bandwidth for multi-peers scenarios.

Following example assumes that you opened audio-only connection between two users; and you're checking bandwidth consumed by outgoing RTP ports.

function getStats(peer) {
    _getStats(peer, function (results) {
        for (var i = 0; i &lt; results.length; ++i) {
            var res = results[i];

            if (res.googCodecName == 'opus') {
                if (!window.prevBytesSent) 
                    window.prevBytesSent = res.bytesSent;

                var bytes = res.bytesSent - window.prevBytesSent;
                window.prevBytesSent = res.bytesSent;

                var kilobytes = bytes / 1024;
                console.log(kilobytes.toFixed(1) + ' kbits/s');
            }
        }

        setTimeout(function () {
            getStats(peer);
        }, 1000);
    });
}

// a wrapper around getStats which hides the differences (where possible)
// following code-snippet is taken from somewhere on the github
function _getStats(peer, cb) {
    if (!!navigator.mozGetUserMedia) {
        peer.getStats(
            function (res) {
                var items = [];
                res.forEach(function (result) {
                    items.push(result);
                });
                cb(items);
            },
            cb
        );
    } else {
        peer.getStats(function (res) {
            var items = [];
            res.result().forEach(function (result) {
                var item = {};
                result.names().forEach(function (name) {
                    item[name] = result.stat(name);
                });
                item.id = result.id;
                item.type = result.type;
                item.timestamp = result.timestamp;
                items.push(item);
            });
            cb(items);
        });
    }
};

You can use it like this:

peer.onaddstream = function(event) {
   getStats(peer);
};

8. How to listen Audio/Video elements native events?

You can easily override "onpause", "onplay", and "onvolumechange" events.

htmlVideoElement.onplay = function () {
    // this event is fired each time when you playback the video
    // via play() method or muted=false or paused=false
};

htmlVideoElement.onpause = function () {
    // this event is fired each time when you pause/stop playback
    // via pause() or muted=true or paused=true or stop()
};

htmlVideoElement.onvolumechange = function () {
    // htmlVideoElement.volume
};

9. How to get list of all audio/video input devices?

Note: Chromium team is implementing "navigator.getMediaDevices" interface which will allow you prefetch both input and output devices.

Following code snippet uses "MediaStreamTrack.getSources" to fetch-out all input audio/video devices.

function getInputDevices(callback) {
    // This method is useful only for Chrome!

    var devicesFetched = {};

    // 1st step: verify "MediaStreamTrack" support.
    if (!window.MediaStreamTrack &amp;&amp; !navigator.getMediaDevices) {
        return callback(devicesFetched);
    }

    if (!window.MediaStreamTrack &amp;&amp; navigator.getMediaDevices) {
        window.MediaStreamTrack = {};
    }

    // 2nd step: verify "getSources" supported which is planned to be removed soon!
    // "getSources" will be replaced with "getMediaDevices"
    if (!MediaStreamTrack.getSources) {
        MediaStreamTrack.getSources = MediaStreamTrack.getMediaDevices;
    }

    // todo: need to verify if this trick works
    // via: https://code.google.com/p/chromium/issues/detail?id=338511
    if (!MediaStreamTrack.getSources &amp;&amp; navigator.getMediaDevices) {
        MediaStreamTrack.getSources = navigator.getMediaDevices.bind(navigator);
    }

    // if still no "getSources"; it MUST be firefox!
    // or otherwise, it will be older chrome
    if (!MediaStreamTrack.getSources) {
        return callback(devicesFetched);
    }

    // loop over all audio/video input/output devices
    MediaStreamTrack.getSources(function (media_sources) {
        var sources = [];
        for (var i = 0; i &lt; media_sources.length; i++) {
            sources.push(media_sources[i]);
        }

        getAllUserMedias(sources);

        if (callback) callback(devicesFetched);
    });

    var index = 0;

    function getAllUserMedias(media_sources) {
        var media_source = media_sources[index];
        if (!media_source) return;

        // to prevent duplicated devices to be fetched.
        if (devicesFetched[media_source.id]) {
            index++;
            return getAllUserMedias(media_sources);
        }
      
        devicesFetched[media_source.id] = media_source;

        index++;
        getAllUserMedias(media_sources);
    }
}

You can use it like this:

getInputDevices(function (devices) {
    for (var device in devices) {
        device = devices[device];

        // device.kind == 'audio' || 'video'
        console.log(device.id, device.label);
    }
});

10. How to choose STUN or TURN and skip Host/Local candidates?

Currently it is not possible for chrome to fetch only STUN or TURN candidates.

A quick workaround is to skip calling "addIceCandidate" for candidates you wanna skip:

var host      = false;
var reflexive = false;
var relay     = true;

peer.onicecandidate = function(e) {
     var ice = e.candidate;
     if(!ice) return;
  
     if(host &amp;&amp; ice.candidate.indexOf('typ host ') == -1) return;
     if(reflexive &amp;&amp; ice.candidate.indexOf('typ srflx ') == -1) return;
     if(relay &amp;&amp; ice.candidate.indexOf('typ relay ') == -1) return;
  
     POST_to_Other_Peer(ice);
};

Above code snippet is taken from this link.

Updated at Jan 22, 2016

You can check tons of other WebRTC tips & tricks at webrtc-pedia page:

https://www.webrtc-experiment.com/webrtcpedia/